When your own system creates the contacts — your website, your back office, your store — the «Subscription» trigger may never see it, because it's waiting for an opt-in your backend never produces. The deterministic answer is the custom event: your system tells arrobaMail "this happened" with an HTTP call, and the flow starts. In practice it's a webhook-style trigger: any system, with a single call, can start an automation.
From your system to the sale
Your site or backend
Added to the list via API
Trigger: Custom event
Automation
Sale or goal
Measure and keep improving
Your system says "this happened" with a single HTTP call. From there on, arrobaMail carries the conversation.
Here's an example to get oriented. A purchase goes through on your e-commerce site. You take that order and, through the API, add the customer to a list with their name, email and the product category. Right after, you record an event that fires the automation: a first thank-you email goes out with related products and, a week later, a second one with news from that same category. That's what you're going to build here.
Before you start
- An arrobaMail account and a list where your contacts land.
- Access to the v3 API (or someone on your team who can write the call).
- The ability to make HTTP calls from your backend. Any language works: these are requests, not an SDK.
- It helps to have built a simple automation first. If you never have, start with the welcome flow from a form.
The 7 steps
- 1
Why a custom event and not «Subscription»
The visible opt-in your backend never produces, and why that leaves the flow waiting forever.
- 2
Create the automation with the «Custom event» trigger
The event name is a contract between your system and arrobaMail: it has to match exactly.
- 3
The key requirement: the contact must already be on the list
The event fires, it doesn't create. Understanding this saves you an afternoon of debugging.
- 4
Record the event from your system
The URL the dashboard builds for you, the parameters, and the pf_ variables that travel into the email.
- 5
Respect the order: sign-up first, event second
Three calls in sequence. Swapping the last two is the most expensive and most silent mistake.
- 6
Activate and verify enrollment
How to confirm the signal arrived and caught, without guessing.
- 7
Security: call from the backend
What gets exposed if the trigger fires from the browser, and how to avoid it.
1. Why a custom event and not «Subscription»
The «Subscription» trigger fires on a form opt-in: the person subscribes, confirms, and only then does the flow start. That's the right path when sign-ups come through a public form, and we walk through it step by step in automate your welcome from a form.
But if your sign-up skips that step — because you do it through the API, from a back office, or with your own form that confirms silently — the "visible" subscription event never happens, and the flow sits waiting for something that will never come. The worst part is that there's no error anywhere: the contact looks perfect on the list, the automation shows as active, and simply nobody enters.
The custom event doesn't depend on any of that. It's an explicit signal you fire when you want, with the name you choose. Deterministic and under your control.
2. Create the automation with the «Custom event» trigger
In the automation editor, open the Triggers category in the palette. It's there, at the end of the list: Custom event.
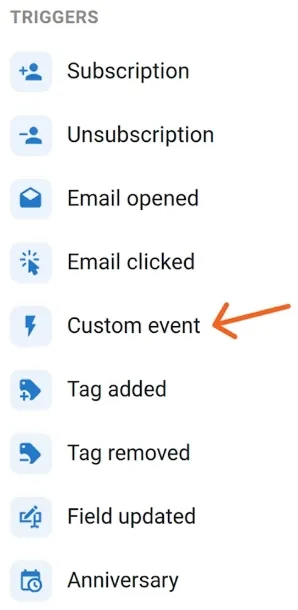
Drag it onto the canvas and open its configuration. It has two fields:
- Event name. Pick a fixed one, no spaces and lowercase, along the lines of
purchase_confirmed,backoffice_signuportrial_expired. This name is the contract with your system: it has to match exactly what you fire, capitalization included. The dashboard suggests examples (purchase,signup,lead,view_product,cart_abandoned,trial_started,trial_expired,plan_changed) that work well as a convention. - Value (optional). A fine-grained filter: if you fill it in, the flow only starts when the event arrives with that value. Useful for having one
plan_changedevent drive different flows depending on the plan.
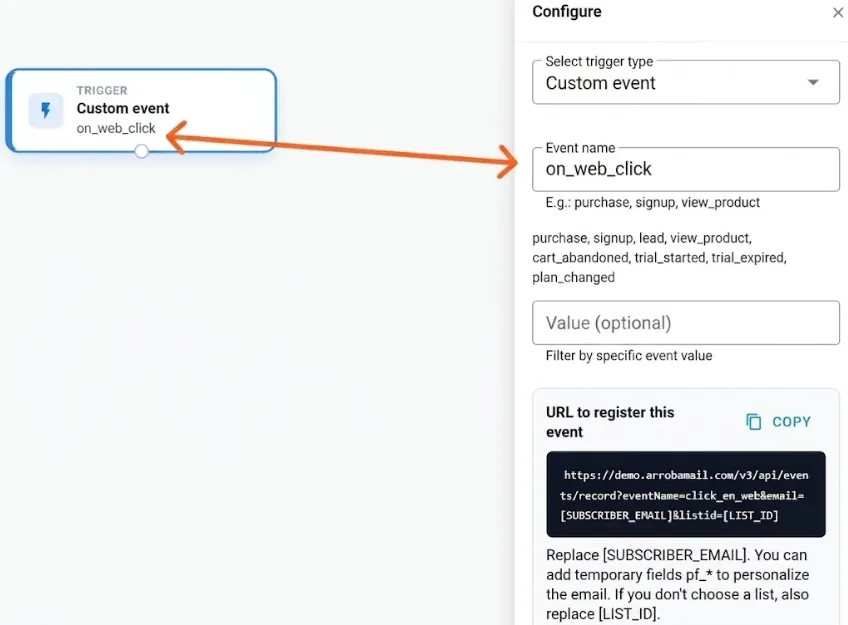
That detail saves time and mistakes: you don't have to construct the URL by hand. You copy it from the dashboard and just replace the two bracketed placeholders.
3. The key requirement: the contact must already be on the list
Here's the point that trips everyone up the first time: the event fires, it doesn't create. The automation needs the subscriber to already exist on the list in order to enroll them.
It's not a contradiction or a strange limitation: it's a separation of responsibilities. Your system owns the contact data (it creates them with their fields), and arrobaMail owns the conversation (it decides which message goes out and when). The event is just the doorbell connecting the two.
In a real flow this resolves itself, because the sign-up naturally happens first: you register the customer, then you announce that they bought.
4. Record the event from your system
When the thing you care about happens, your backend calls the events endpoint. This is the shape the dashboard hands you:
GET /v3/api/events/record?eventName=purchase_confirmed&email=[SUBSCRIBER_EMAIL]&listid=[LIST_ID]
The parameters:
eventName— the exact name you configured in step 2. If it doesn't match character for character, it won't fire.email— the address of the contact that's already on the list. Replace the[SUBSCRIBER_EMAIL]placeholder.listid— the list identifier. You have it in the dashboard; replace[LIST_ID].eventValue(optional) — only if you configured the value filter.pf_*(optional) — temporary fields that travel with the event and can be used inside the email without storing them on the contact:pf_order_id,pf_total,pf_category. In the template they're written as{{{$pf_order_id}}}, with the leading$, just like subscriber variables.
A complete example with curl, against the free trial account:
curl -G "https://demo.arrobamail.com/v3/api/events/record" \
  --data-urlencode "eventName=purchase_confirmed" \
  --data-urlencode "[email protected]" \
  --data-urlencode "listid=YOUR_LIST_ID" \
  --data-urlencode "pf_order_id=ORD-123" \
  --data-urlencode "pf_total=99.90"
The domain is your account's. In the example we use
demo.arrobamail.com, which is where anyone can try arrobaMail for free. If your account lives on a different server, the URL you copy from the dashboard already carries yours. The general API base is documented in the v3 API quickstart.
A quick alternative for testing. There's also a legacy path,
POST /eventRecord.php, still in service, which accepts the same parameters in the request body. It has one concrete advantage for testing and for production: because it goes over POST, the email doesn't travel in the URL. The documented endpoint, and the one the dashboard builds, isGET /v3/api/events/record; if keeping addresses out of your logs matters to you, the legacy POST is a valid option.
5. Respect the order: sign-up first, event second
Point 3 leads to the most important operational rule in this tutorial. The full sequence, from your backend, is this:
Order matters · 3 calls
- 1POST
/auth/getToken - 2POST
/lists/:id/subscribers - 3GET
/events/record
If the event arrives before the sign-up, it finds no contact and does not fire. Since in a real flow the sign-up happens first, the natural order is already the right one — you just have to not invert it.
If the event arrived before the sign-up, it finds no contact and doesn't fire — and again, with no visible error. Since the sign-up naturally happens first, the natural order is already the right one: just make sure your code doesn't fire them in parallel, because that's where they can cross.
With the trigger connected, the arrobaMail side of the flow looks like this:
- Trigger · Custom event
Your system records "purchase_confirmed"
One HTTP call from your backend, right after adding the contact to the list.
- Email 1 · Thanks for your order
Confirmation with related products
You can use the data you sent in that same call: order number, amount, product category.
- Wait
7 days
- Email 2 · News from their category
You come back with content, not another pitch
The follow-up almost nobody does, and the one that turns a first purchase into a second.
- Exit
End of the flow
If tomorrow you want a third email, you add it here without touching a line of your system.
The trigger comes from your system; the content and the timing live in arrobaMail. Each side does what it does best.
Notice what your team gains: the content and the timing live in arrobaMail. If tomorrow you want to add a third email, stretch the wait from 7 to 10 days, or change the copy, you do it in the visual editor — without touching a line of your system or deploying anything.
6. Activate and verify enrollment
Save and activate the automation — as with any flow, a draft processes nobody.
For the test, do it in three beats and don't guess:
- Confirm your test contact is on the list (look at it in the dashboard, don't assume).
- Note the automation's current enrollment count.
- Record the event for that address and check the count again.
If the number went up, the signal arrived and caught. If it didn't, the problem is in one of three places, always in this order of likelihood: the event name doesn't match exactly, the contact wasn't on the list, or the listid belongs to a different list.
7. Security: call from the backend
Two recommendations for production, in order of importance.
Make the call from your server, never from the visitor's browser. This is the one that matters most. If the trigger fires from the front end, anyone can open dev tools, see the full URL — your listid included — and start firing flows for arbitrary addresses. Don't expose the listid on public pages.
Keep in mind that a GET leaves a trail. With GET, the email travels in the URL and ends up in server logs, in history, and in Referer headers. From the backend that's far less serious — there's no browser and no referer involved — but if you handle sensitive data or have a strict log retention policy, the POST /eventRecord.php path from step 4 keeps the email out of the URL.
In short: server-side call and, if your context calls for it, POST. That leaves the trigger secure, private and under your control.
The three triggers that start a conversation
This tutorial covers the most flexible of the three, but it's worth holding all of them in your head: picking the right trigger is 80% of the work of an automation.
| Trigger | Fires when… | Best for | Guide |
|---|---|---|---|
| Subscription | someone confirms their sign-up to a list | a welcome sequence from a form on your site | welcome from a form |
| Custom event | your system records an event through the API | purchases, sign-ups from your backend, any action on your platform | this guide |
| Email open / click | a contact opens or clicks a campaign | interest-based follow-up, resends, re-engagement | automating by behavior |
The full reference is in automation triggers.
Common mistakes to avoid
- An event name that "almost" matches.
Purchase_Confirmedis notpurchase_confirmed. Define the name once, lowercase, and copy it from one side to the other. - Firing the sign-up and the event in parallel. They look like two independent calls, but the second depends on the first. Chain them.
- Firing from the browser. Convenient for testing, indefensible in production.
- One generic event for everything. If
signupdrives five different flows, in three months nobody knows which does what. One event per intent, and the value field for the variants. - Forgetting to activate the flow. True for every automation, and still the number one cause of "it doesn't work".
Next steps
- Go over the detail of each trigger in automation triggers.
- If you also want arrobaMail to notify your system when something happens, the reverse path is live event webhooks.
- For confirmations, codes and invoices your backend composes, look at the three ways to send transactional emails.
- And to have the flow also react to what each contact does, continue with opens and clicks.