
For a welcome email to go out on its own every time someone subscribes from your website, you need three connected pieces: a subscription form that adds the person to a list, an automation whose trigger is «Subscription» on that same list, and the contact's confirmation (double opt-in), which is the exact moment the flow starts. In this guide we connect all three end to end, test them with a real subscription, and explain the detail that makes a lot of people say "it doesn't fire".
From form to welcome
Form on your site
Added to the list
Trigger: Subscription
Welcome automation
Activated subscriber
Measure and keep improving
The only manual step is pasting the form on your site. Everything after that happens on its own, for every person, at any hour.
Here's an example to get oriented. On your website you have a newsletter subscription form. Someone leaves their name and email, confirms, and from that moment on — without you lifting a finger — the sequence begins: they get a welcome email that introduces your brand and, a few days later, a second email with the first steps to make the most of what you offer. That's what you're going to build here.
The welcome sequence is, for most businesses, the automation with the best return, and the reason is simple: right after someone signs up is when they're paying you the most attention. While you sleep, every person who subscribes gets the right message at the right time.
Before you start
- An arrobaMail account. The free DEMO account is enough to do everything in this guide end to end.
- A subscriber list where the form's contacts will land.
- A verified sender. If you don't have one yet, it takes five minutes: verify your sender from scratch.
- Access to your website to paste the form code, and a test email address for the final check.
The 6 steps
- 1
Prepare the list and the form
Where contacts land and where they sign up from: the two ends of the cable you're about to connect.
- 2
Create the automation with the «Subscription» trigger
Tools → Automation → New. Drag the trigger onto the canvas and point it at your list.
- 3
Design the flow: waits and emails
Two emails separated by waits. The rhythm matters as much as the content.
- 4
Personalize with subscriber variables
The {{{$sus_field}}} syntax, exact matching, and the default value that prevents «Hi ,».
- 5
Activate and test with a real subscription
A draft automation processes nobody. Test it by subscribing yourself.
- 6
Double opt-in: why it sometimes «doesn't fire»
The trigger waits for the confirmation, not for the form submission. Almost every «it doesn't work» is this.
1. Prepare the list and the form
It all starts with the list: it's where contacts land and, more importantly for us, it's what the automation will be watching. Under Subscribers, pick an existing list or create a new one with a name that will still make sense in six months ("Website newsletter" beats "List 3").
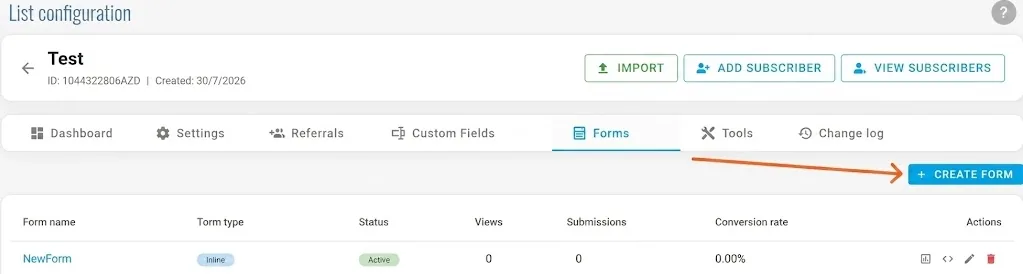
With the list ready, open its settings and look for Forms. That's where you build the subscription form: you choose which fields you ask for (email is required; the personalization in step 4 will thank you for the name too), the styling, and the success message the person sees after submitting.

Ask for little. Every extra field on a form lowers your conversion rate. Email and first name are enough to start; you'll fill in the rest over time, once the person already trusts you.
When you save, arrobaMail opens the embed code with a Copy code button. It's two lines shaped like this:
<div id="fm-form-YOUR_FORM_ID"></div>
<script src="https://your-server.arrobamail.com/js/fm-forms.js" data-form-id="YOUR_FORM_ID" async></script>
Don't type it by hand: copy it from the dashboard, which hands it to you already filled in. The div is the slot where the form will be drawn — put it exactly where you want it to appear — and the script is what draws it. Two details worth knowing:
- The
srcdomain is your account's. If you're working in the free trial account it will bedemo.arrobamail.com; on a production account, whichever server you've been assigned. That's why it's better to copy than to transcribe. - The
asyncisn't decorative: it lets the script load without blocking your page from rendering. Leave it where it is.
Paste that block on the page where you want to capture sign-ups. From now on, every submission of that form adds the contact to that list — and that is exactly what will fire the automation.
2. Create the automation with the «Subscription» trigger
Go to Tools → Automation → New automation.
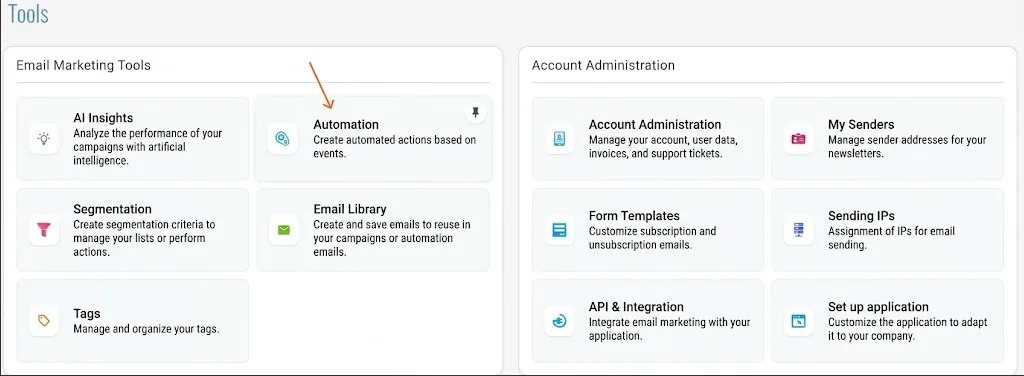
You'll see the two zones of the editor: the palette on the left — with its four categories, Triggers, Actions, Conditions and Logic — and the canvas on the right, where you drop and connect the blocks. Give the flow a clear name, and keep an eye on its status: it's born as a Draft, and in that state it processes nobody.
Open Triggers. There are five: Subscription, Unsubscription, Email open, Email click and Custom event. Those are the five ways arrobaMail has of finding out that something happened. Today we want the first one: drag Subscription onto the canvas and, in its Configure panel, pick the list from step 1.
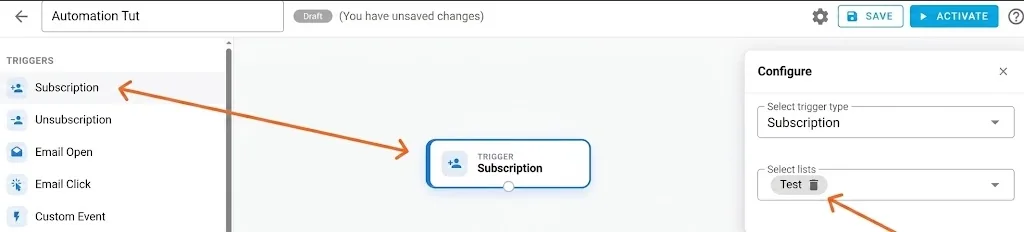
That defines the entry rule: when a contact subscribes to this list, they enter the flow. The cable is connected.
3. Design the flow: waits and emails
Below the trigger you chain the blocks. For a welcome sequence, a simple and very effective pattern is: a short wait, the welcome email, another wait, and a second email with the first steps. You close with an Exit.
- Trigger · Subscription
Someone confirms their sign-up from your form
The flow starts when the person confirms their subscription, not when they submit the form. That nuance explains almost every "it does not fire".
- Wait
1 day
- Email 1 · Welcome
You introduce yourself and say thanks
Who you are, what they will get and how often. No selling yet.
- Wait
3 days
- Email 2 · First steps
The most useful thing you have to get them going
A guide, a resource, or the shortest path to your product. This is where trust is built.
- Exit
End of the flow
The contact stays on your list, already introduced, ready for your regular campaigns.
Two emails and two waits. You build it once and it runs on its own for every person who confirms their subscription.
Each Send email block uses a template from your library, and each Wait block sets the time between messages, in hours or days. Waits aren't filler: they're what turns an annoying burst into a pleasant sequence. Two emails on the same day feel like spam; those same two emails three days apart feel like attention.
If you want to go further and build the full sequence — what to say in each email, when the first offer shows up, and how to branch for people who don't respond — that's the natural next step: building a 4-email welcome series that converts.
4. Personalize with subscriber variables
Inside each email you can insert the contact's data so the message speaks to each person directly. Subscriber variables are written as {{{$sus_field}}} — with the leading $, which is part of the syntax. For the first name:
Hi {{{$sus_name}}}, welcome aboard!
Two details worth keeping in mind:
- The match is exact. The field name has to match the one stored in your list, capitalization included. A
{{{$sus_Name}}}when the field issus_namewon't resolve. - If the data is missing, the variable comes out empty. That's where the classic "Hi ," shows up and gives the automation away. Set a default value for that field, or test with a contact whose data is complete before you activate.
5. Activate and test with a real subscription
Save and hit Activate. This step is not optional: an automation in Draft processes nobody, and it's the number one cause of "I built it and nothing happened".
For the test, don't add a contact by hand. Subscribe through your own form with a test email address and follow the whole journey: the confirmation email arrives, you confirm, and from there you watch the automation panel, where you'll see the enrollment count go up and the status of each contact inside the flow.
Important: the «Subscription» trigger counts sign-ups that come in through a real subscription. Contacts you add by hand from the dashboard stay active on the list but do not fire the automation. If your own system adds contacts — from your website, your back office or your store — the right path is a different one: a custom event fired through the API.
6. Double opt-in: why it sometimes «doesn't fire»
Here's the detail that explains almost every "it's not working". arrobaMail protects your lists with double opt-in: when someone fills in the form, they first receive a confirmation email, and the «Subscription» trigger fires when they confirm, not when they submit the form.
In other words, between the click on "Subscribe" and the start of the flow there's an intermediate step that depends on the person. If you're testing and see no movement, check the confirmation email — spam folder included — before you touch anything in the flow.
And even when it feels like friction, double opt-in is one of the best things that can happen to your list: it filters out mistyped addresses, blocks bot sign-ups, and leaves only people who actually wanted to be there. That translates into better opens, fewer bounces and healthier sending reputation. It's the difference between a big list and a list that lands.
The three triggers that start a conversation
Of the five triggers in the palette, three are the ones that start conversations with your contacts. It's worth knowing them together, because picking the right trigger is 80% of the work of an automation:
| Trigger | Fires when… | Best for | Guide |
|---|---|---|---|
| Subscription | someone confirms their sign-up to a list | a welcome sequence from a form on your site | this guide |
| Custom event | your system records an event through the API | purchases, sign-ups from your backend, any action on your platform | firing through the API |
| Email open / click | a contact opens or clicks a campaign | interest-based follow-up, resends, re-engagement | automating by behavior |
The full reference — what each one needs, what data it carries, and how they combine — is in automation triggers.
Common mistakes to avoid
- Leaving the flow in Draft. It saves, it looks fine, and it processes nobody. Always check the status before calling it done.
- Testing by adding a contact by hand. It doesn't fire, and it makes you think the flow is broken. Test by subscribing through the real form.
- Pointing the trigger at a different list. If the form adds people to "Website newsletter" and the trigger watches "Customers", nothing shows up as an error anywhere: nobody ever enters.
- Selling in the first email. It's the most-opened email of the whole relationship. Using it to push product burns the trust before you've built it.
- Forgetting default values for variables. One "Hi ," ruins the effect of everything else in a single line.
Next steps
- Learn every available block in automations and the detail of each trigger in automation triggers.
- Make sure your sign-ups arrive clean with subscription forms.
- When your own system is what adds the contacts, move on to triggering automations from your system through the API.
- And when you want the flow to react to what each person does, continue with opens and clicks.