
Connecting arrobaMail to Claude takes two minutes and requires no code: copy your MCP server URL from the dashboard (Tools → MCP (IA)), paste it into Claude as a custom connector, sign in with OAuth, and you're done. From that moment you ask for things by chat — "show me the open rate of my last campaign," "add these contacts to the Customers list," "draft the launch email for Friday" — and Claude does them on your real account, with your data, asking for confirmation before anything gets sent.
That's what MCP (Model Context Protocol) enables: the open standard that connects AI assistants to applications — created by Anthropic and now governed neutrally under the Linux Foundation, with support from OpenAI, Google, and Microsoft. arrobaMail has had its native MCP server since mid-2026; what's new is that the connection is now OAuth 2.1: no API key to generate, no terminal to touch. This guide walks through it step by step with real screenshots, and at the end you'll find the paths for Claude Code, ChatGPT, and Cursor.
Before you start
- An arrobaMail account (the Free Plan is enough to try all of this).
- An MCP-compatible AI client: Claude (custom connectors require a Pro or Max plan), Claude Code, ChatGPT on a paid plan, or Cursor.
- Two minutes. Really: no keys to copy, nothing to install.
The 7 steps
- 1
Copy your MCP server URL
In the arrobaMail dashboard: Tools → MCP (IA). One click to copy and you have everything you need.
- 2
Add the connector in Claude
Settings → Connectors → Add custom connector: a name and the URL. That's it.
- 3
Connect and authorize with your session
OAuth: arrobaMail opens, you sign in and choose the permissions. No shared keys.
- 4
Enable it and make your first request
Turn the connector on in the chat and talk to it in plain language, like an assistant that knows your account.
- 5
Prefer another client? The same URL works
Claude Code, ChatGPT, Cursor, VS Code, Windsurf: the dashboard shows the exact steps for each one.
- 6
Security: you authorize, you stay in control
The AI sends nothing without your confirmation, and you can revoke access at any time.
- 7
If something doesn't show up
The two or three typical MCP connector hiccups and how to fix them in seconds.
1. Copy your MCP server URL
Open the arrobaMail dashboard and go to Tools → MCP (IA). At the top you'll see the "Secure connection with OAuth" section (marked Recommended) with your server URL:
https://YOUR-SERVER.arrobamail.com/v3/api/mcp
Copy it with the button on the right. YOUR-SERVER depends on where your account lives (for example s1 or envios) — which is why it's best to always copy it from the dashboard, where it's shown ready-made and up to date.
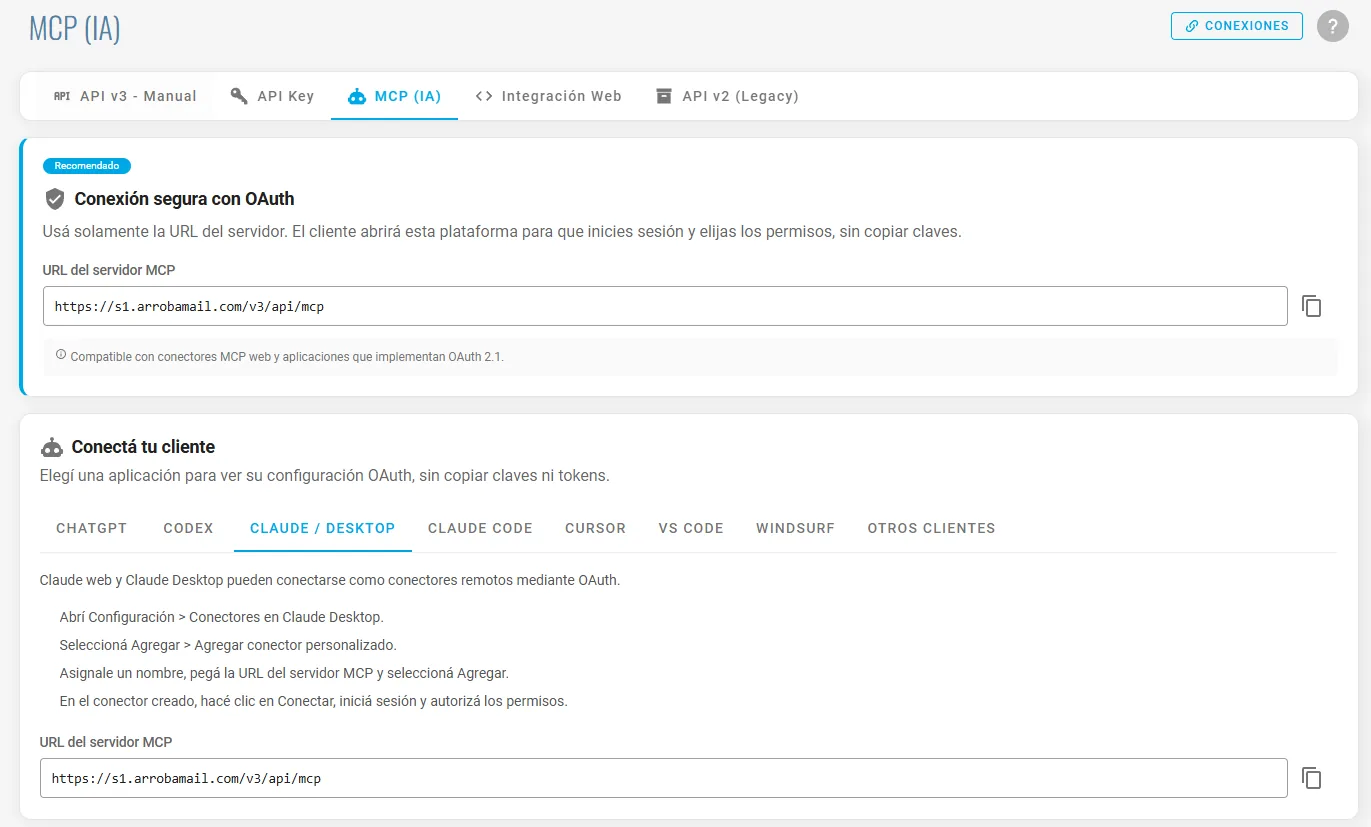
On that same screen, the "Connect your client" section has one tab per application (ChatGPT, Codex, Claude, Claude Code, Cursor, VS Code, Windsurf, and others) with the exact steps for each. This guide follows the Claude path, which is the most direct.
2. Add the connector in Claude
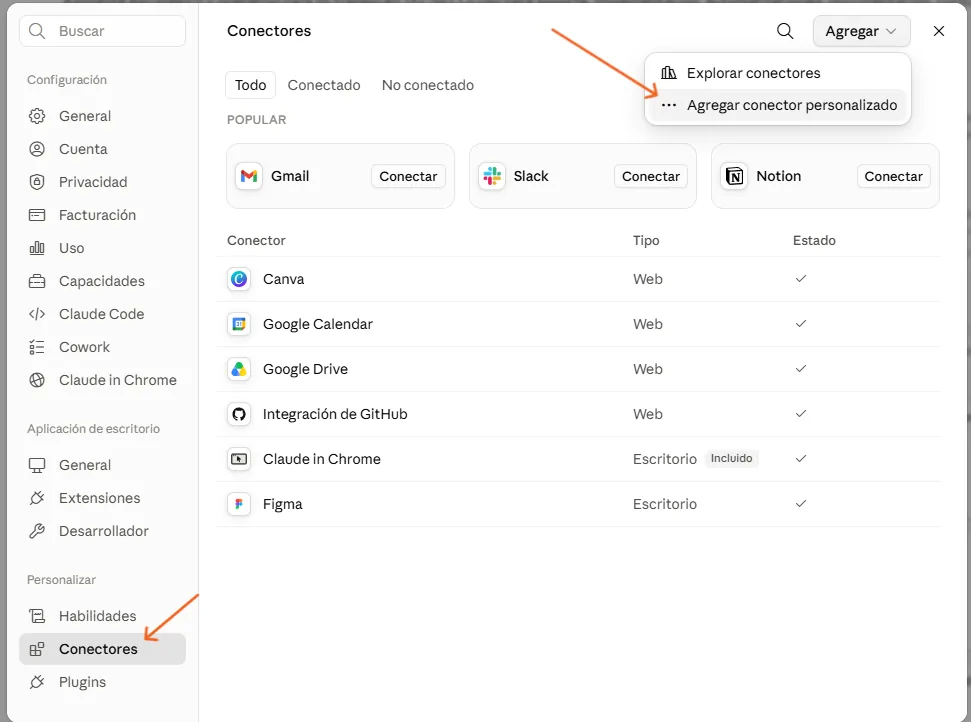
In Claude Desktop (or on claude.ai in your browser) open Settings → Connectors, click Add, and choose "Add custom connector".
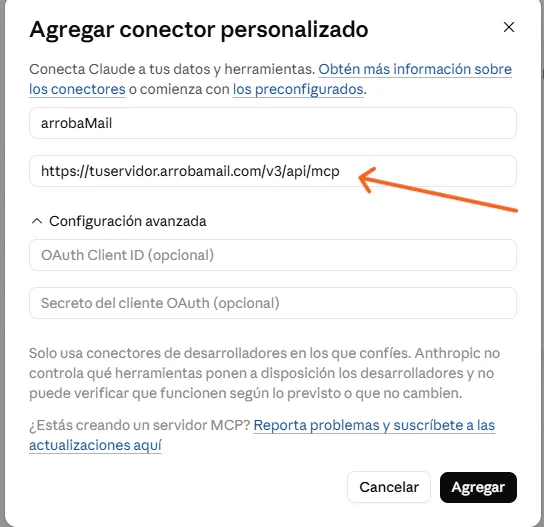
In the dialog, enter a name (for example, arrobaMail) and paste the URL you copied in step 1. Leave the advanced settings alone: the OAuth Client ID and secret fields are optional and not needed. Confirm with Add.
Custom connectors are available on the Claude Pro and Max plans; on Team and Enterprise an administrator enables them for the whole organization.
3. Connect and authorize with your session
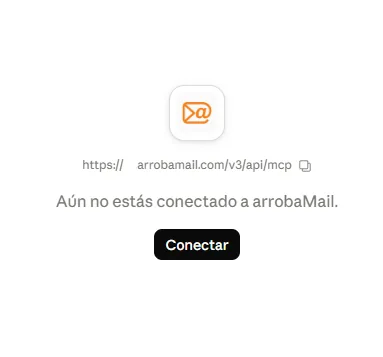
The new connector appears with a Connect button. Clicking it opens arrobaMail so you can sign in with your account and authorize the permissions. That's the entire "setup": OAuth means you never share keys — you authorize with your session, just like connecting an app to your Google account.
One detail that's worth a lot: you add the connector once and it's available across every Claude surface — the claude.ai chat, Claude Desktop, Cowork, and even Claude Code (with the same subscription, your connectors load automatically).
4. Enable it and make your first request
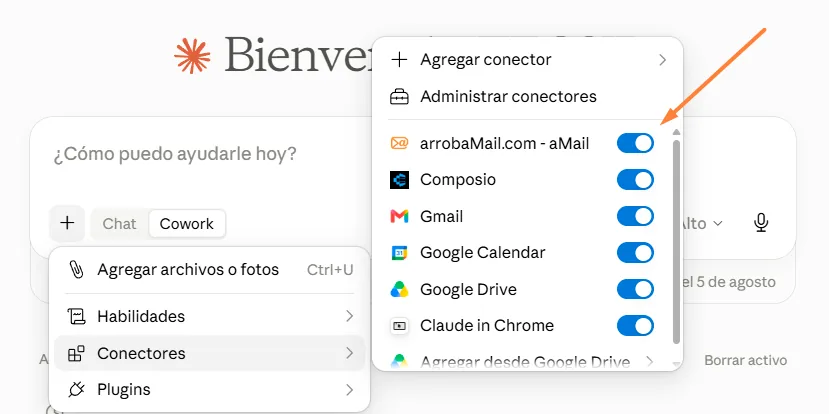
In the chat, open the + → Connectors menu and turn on arrobaMail. From that moment, Claude can query and operate your account in real time.
Talk to it in plain language, like an assistant that knows your account:
- "Show me my latest campaigns with their opens and clicks."
- "How many active subscribers does my main list have?"
- "Add these three contacts to the Customers list."
- "Draft the Friday launch email, friendly tone, with a button to the landing page — and leave it in drafts."
- "Compare the July campaign against June's and tell me what you'd improve."
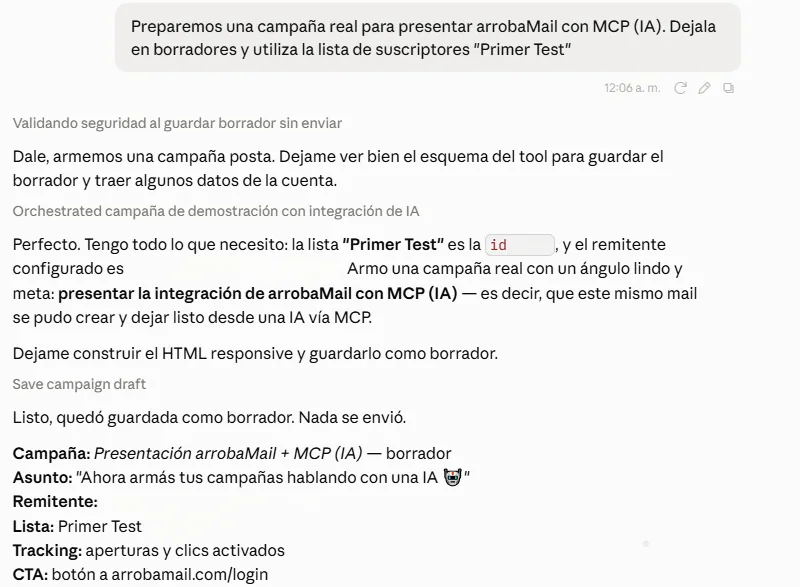
arrobaMail's MCP server exposes the full cycle: campaigns and statistics, lists and subscribers, segmentations, automations, drafts, and send scheduling. The full tool catalog is on the MCP page. And inside the platform you have Amanda IA, which generates content and images with the 40 monthly generations included in every plan: your assistant on the outside, Amanda on the inside.
5. Prefer another client? The same URL works
The connector is a standard: any MCP client connects with the same URL. The three most requested paths:
Claude Code (terminal): one command, and OAuth authentication happens with /mcp inside the session.
claude mcp add --transport http arrobamail https://YOUR-SERVER.arrobamail.com/v3/api/mcp
Then, inside Claude Code, run /mcp to sign in, and verify with claude mcp list (it should read Connected).
ChatGPT: enable developer mode under Settings → Connectors → Advanced → Developer mode (paid plans) and create the connector with the same URL.
Cursor: add the server to .cursor/mcp.json:
{
  "mcpServers": {
    "arrobamail": {
      "type": "streamable-http",
      "url": "https://YOUR-SERVER.arrobamail.com/v3/api/mcp"
    }
  }
}
For VS Code, Windsurf, and the rest, the arrobaMail dashboard (Tools → MCP (IA)) shows a tab with the exact steps for each client, always up to date. Developer clients also accept the classic API Key connection (the dashboard's API Key tab) if you prefer it for automations.
6. Security: you authorize, you stay in control
- Claude sends nothing on its own. Sensitive write operations — sending or scheduling a campaign — always ask for your confirmation, and sends require a verified sender. Creating a draft sends nothing: you keep your hand on the final button.
- No shared keys. The OAuth connection is authorized with your session and you can revoke it any time from your arrobaMail account. It's the scheme the MCP specification requires (OAuth 2.1), and the reason we never ask you to paste tokens into third-party forms.
- Explicit permissions. On the authorization screen you choose what the connector can do. Fewer permissions, smaller surface.
7. If something doesn't show up
- The connector isn't listed in the chat → check that it's enabled in that conversation's + → Connectors menu (it's toggled per chat).
- Authorization doesn't complete → disconnect the connector, hit Connect again, and sign in once more. If you use several arrobaMail accounts, confirm you authorized with the right one.
- "Not connected yet" after a while → access may have been revoked or expired; reconnecting takes the same two clicks as step 3.
- The URL doesn't respond → copy it again from the dashboard: if your account lives on a different server, the correct URL is the one the dashboard shows.
With the connection in place, the next step is making it earn its keep: in Claude + Cowork: live dashboards and automated tasks we set up recurring reports and self-updating dashboards, all by conversation.